
this page will feature all the new step by steps as and when i do them they will feature here before i transfer them over to the tying predator flies website new step by steps will be announced on the blog and also on my pike flies facebook page as they become available
-------------------------------------------------------------------------
PIKE SKINZ RAINBOW TROUT
DYCKERS SOFT FIBER BAITFISH
MCFLUFFCHUCKERS EPOXY HEADED BAITFISH


-------------------------------------


-------------------------------------------------------------------------
PIKE SKINZ RAINBOW TROUT
DYCKERS SOFT FIBER BAITFISH
MCFLUFFCHUCKERS EPOXY HEADED BAITFISH
TYING AN EP ROACH

you will need the following
hook : 6/0 cz or similar long shank lightweight hook
belly : white ep fiber
back ; any combination of green ep ( ive used 3d minnow blend here)
gill flash :red angel hair
extra back flash : peacock angel hair
eye :- 8mm gold
clear varnish
super glue
clear mono predator thread
the step by step

place hook in vice (really i hear you cry) but actually wrong placement of the hook means your hook will move about in the vice no matter how tight its in so this is my preferred placement for a solid hold

tie on your thread so that is in line with the hookpoint and secure with a little varnish , this makes it tooth proof and give the thread a strong base

take you first section of white ep fibre ( full length) and place on the hook so you have around a quarter of the material past the hook eye

spread the fibre around the hook shank and tie down quite firmly your going to go up to just behind the hook eye as you can see in the picture below (your varnish will still be a little wet which will soak into the fiber , this is all good

next fold back underneath the white ep that was sticking out the front and give a couple of wraps to secure this will start to give you the body shape

flip the hook over and make sure the fiber is split evenly on each side of the hook

take another length of ep and tie in, this section will be slightly longer at the front (this helps with the shape) and secure down with a couple of wraps

take your back section again a full length with about a quarter poking out the front then flip it back as you did with the white section earlier and secure with a couple of wraps

next you need to add another white section in with again around a quarter poking out the front then add in a pinch of red angel hair and secure with a couple of wraps

then take another section of ep (again less is more with ep fiber ) and place it on top of the angel hair

then fold back and secure with a couple of wraps and flip the hook back round

as you can see the angel hair is now well blended in and a visual trigger point for predators as well as a lovely flash in the water

now add a full length of the back fiber with just over the quarter past the front of the hook ete

now add in your lengths of peacock angel hair on top of the fiber again some protruding past the hook eye

fold it all back and secure with a couple of wraps of thread

flip the hook and add one very sparse section of white ep with again a quarter of the material past the hook eye

fold back and secure with a few wraps (we only ever use a few wraps so as not to build up too bigger head)

tie off and add a few drops of varnish to secure the whipping

and heres your 99% finished fly , as you can see by placing ep forward of the hook eye in various lengths you have produced a nice tapered body pattern

take your eyes in this case a couple of gold 8mm (i like red 3d stealhead eyes on this pattern from deercreek but ran out so using basic eyes )

using superglue (place on the back of the eye not direct to the fiber as it will soak right in and your eye wont stick ) place eye where you want it , i quite like it near the front of the hook eye as i believe it makes the fly balance better in the water and especially if you use epoxy heads

close up of the finished head looking very fishy if you ask me

and there you have a darn fine looking natural pattern

of course you can mix up the fiber colors or add more or less flash or change the eye color like ive done on the fly above

this can be a standard way of tying with ep but by adding flash to it you can pretty much customize and pimp your flies out , i often mix fibers together and add flash to create new blends and to be honest theirs thousands of combinations out there so did in and give it a try , one tying method and a thousands different flies .
tight lines from the cave fellow flingers

BIG FLASH FLY STEP BY STEP
ok folks i had a recent request to do a photo step by step for a large flashy type fly for pike and no doubt muskies would be up for it as well if you tuning in from the states so as always happy to oblige , for this fly you will need the following
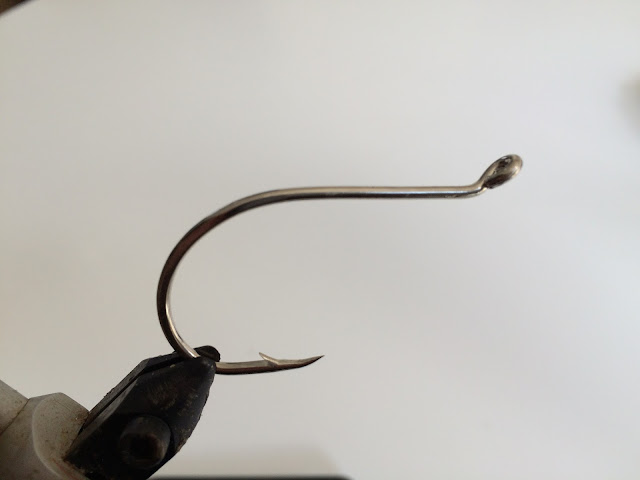
6/0 octopus hook
magnum flashabou in silver
orange uv fritz
clear mono tying thread
uv finish (dont use bugbond it cures tacky) or varnish

1 - ministry of the bloody obvious , stick the hook in the vice

2 - add a pinch of strong glue (i use zap a gap ) i wish they would do croc glue again that stuff was awesome

3 - take your mono tying thread and wrap around the hook making sure you spread the glue as you wrap round , this give a strong tying base and you materials wont move on the hook when finished

4 - take you flashabou and place along the hook at the point of the curve , leave enough material to fold a few inchs back over this will help profile the fly

5 - take a length (around 2 inchs) of chenille and tie in in front of the flashabou

6 - wrap around until you have a ball of chenille and tie down (the reason for this will be obvious in the next few steps)

7 - now take a few strands of flashabou and place around 3 quarters of it facing away from the hook

8 - repeat this on each side and top and bottom and add a couple of wraps of mono to hold in place

9 - now take each piece from the top middle and sides one at a time and fold back and secure

10 - now you can see what the ball of chenille does it give the material something to lye on creating a profile when wet

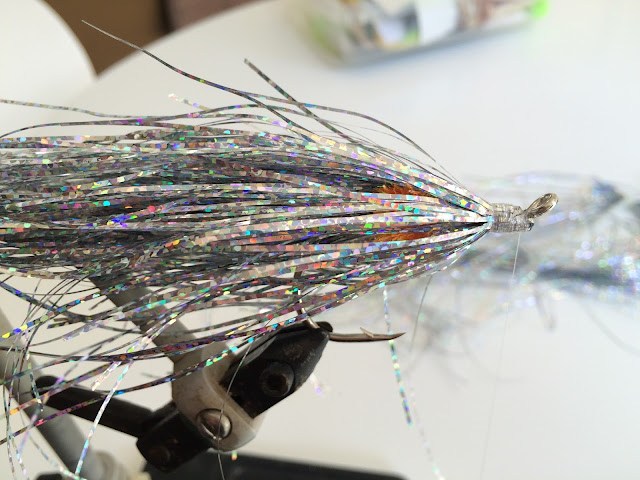
11 - take a few full strands of flashabou and tye in this will give you length on the back of the fly , also worth noting you can add any color of flashabou at this point to create a different back color

12 - now tie off and seal with a high quality uv (i still use deer creeks uv as quite simply it is the best out there and cures in a few seconds , unlike other brands which dry tacky )

13 - a few seconds blast and its cured

14 - a fast perfectly bombproof head

and there you have it a fast simple and very effective predator fly and worth having a few in your box
below is a few examples of different ideas you can do to pimp em up


have fun
greetings from the cave
mcfluffchucker
MYLAR BAITFISH
(may 2015)
STEP BY STEP
You will need

e-z body by hareline (medium)
small eyes 4mm
Crystal or micro flash
angel hair (red)
saltwater hook
(im using a 1/0 for a 3 inch baitfish)
Clear mono thread
Deercreeks diamond flex

1 – cut a section of tubing to your desired length , im using 3 inchs
on a 1/0 for every hook size up id add an extra inch , when you get to around
3/0 hooks id start using large tubing . and the reverse lower than 1/0 id go
for small tubing , of course you can go very small on these for smaller
predators (think about dead drifting smaller sizes in streams for trout )

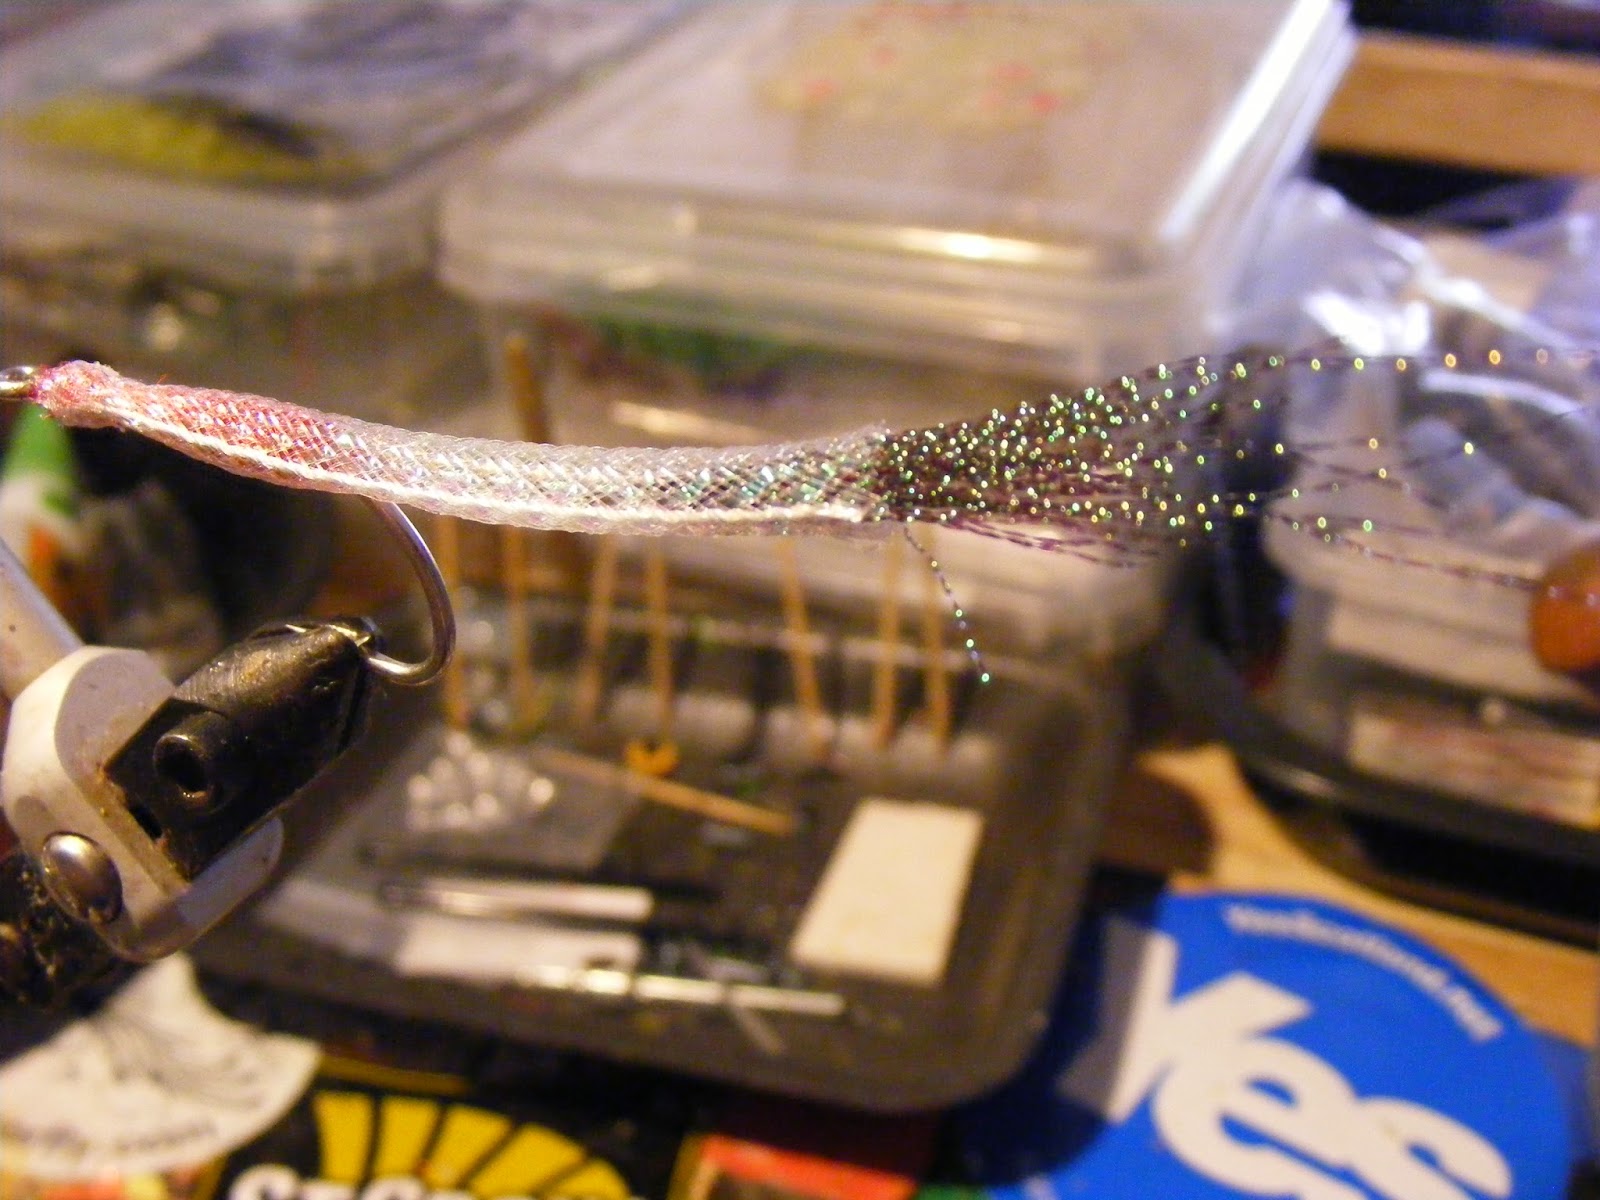
2– Thread the hook eye first through the braid (can be
a bit fiddly) , you can leave the white
cotton in the braid as this makes a fine lateral line

3 – heres how you need the hook to sit so the eye is just poking out
the end of braid and the Mylar going back from the where the hook starts to
bend

4 – you should have it looking like this on the hook

5 – pull the braid back to reveal bare hook shank and add a few wraps
of mono

6 – Take a small amount of angel hair in your desired
colour (I think red works really well)

7 – Place on hook shaft and tease round the shank and secure with a few
wraps

8 – Take the forward facing section of angel hair and twist into a rope
with your fingers and wrap evenly around the hookshank

9 – Then secure with a wrap of mono

10 – Next take a bobbin needle and push remaining angel hair into the
tube

11- when its all in it will look like this

12 – Secure with a few wraps of mono till you have formed a head

13 – turn the hook around in the vice , ready for working the tail in

14 – as you can see the cotton core makes a great lateral line

15 – take a small amount of crystal flash

16 – Heat the end with a lighter and roll to stick the ends together,
this makes it easier to place in the tubing
17 – place into the tubing

18 – Add a few wraps of mono to secure and tie off

19 – Trim any uneven flash to form an even tail profile

20 – Turn hook around and we are ready for building the head

21 – Place a small eye on just behind the eye of the hook

22 – add a drop of deercreeks diamond flex uv behind the eye and zap
with a uv pen (if you don’t have uv product you can use either epoxy or super
glue and varnish but this does take a while to build up a good head shape)

23 – Rotate the hook and continue to build up layers

24 – I build up the head by doing the top then the side then the bottom
until you get the right head shape . (if using epoxy coat the head then place
in a rotary drier till dry)

25 – When your happy with the head shape you can then move onto the
tail

26 – Add a small drop of uv to secure the tail in

And boom there you have it; tell me that aint a great little pattern
Mcfluffchucker
(a cave in scotland)

----------------------------------------------------------------
(may 2014)
NAYAT HAIR BAITFISH
Heres step by step
for a very easy and effective baitfish have it as big or as small as you like
or whatever colour you like, looks great in the water
You will need
Nayat hair
(www.foxy-tails.co.uk)
8mm 3d eyes (www.deercreek.co.uk
Phantom thread
Esox 1 - 6/0
Oliive flashabou
Croc glue
1 – Take your phantom thread and tie on from the
hook eye back to a point level with hook point as
2 – Take a whole
length of nayat hair (not to thick) and cut at the base and lay to one side
3 – Add a very fine
coating of croc glue (this makes the whipping bombproof and gives the nayat
something to bond to)
4 – Place the nayat
on the hook shank and gently press down so it goes all around the hook
shaft, leave a small area behind the
hook eye as above , this will be for the next section of nayat ,the length you
have on this first piece will ultimately be the final length of the fly
5 – Next take a
section of your back colour and tie it in on top of the first white piece as
above and remembering to leave that small clear area behind the hook eye
6 – take a small
amount of flashabou (take a whole length of the material rather than having odd
lengths left of the hank) and tie in at the head of the fly on the clear bit
you left behind you can see this in the photo below
7 – Now we take
another full length section of white nayat and place under the hook facing forward,
again on the bare hook shank area and add a little dab of croc glue to secure,
then take a section of your back colour and tie in the same as the white but on
the top
8 – Take a pen tube
and hollow tie (pushing the materials backwards with the pen to give body
volume without the weight) you can see that the flashabou sits nicely in the
material also
9 – Once you have
pushed back with the pen hold the material with your thumb and fore finger and
remove the pen, then whip the material down to secure (I add a dash of varnish
to secure and protect the thread)
10 – Take another
long section of flashabou (half a dozen strands) and tie onto the whipping
before the varnish dries, we are now ready for the last 2 pieces of nayat to
make the head profile
11 – we now do steps
7 and 8 again but this time you want to use half the amount of nayat , and also
add in a few more strands of flashabou facing forward , this time you should
also cut of the excess behind the thread , this allows for a less bulky nose to
the fly
12 – This is what you
should have ready to hollow tie back; you can see where ive trimmed the waste
behind the thread
13 – Follow step 8
again and just allow the flashabou to sit naturally where it wants to go
14 – once hollow tied
finish off with a few wraps , then a small amount of varnish to secure
15 – There you have
the basic fish shaped nayat fly now we are ready for the eyes
16 – The eyes have a
sticky backing so you can test for the best position before you start to apply
the epoxy once your happy with where the eyes are going take them off
17 – I use a small
amount of 5 min epoxy ( z poxy is the only one I use ) if im doing a lot of the
same fly ill use a longer setting epoxy so mix the epoxy up (cocktail sticks
are good for this) although I have an old wine cork with a darning needle stuck
into it
18 – take a blob of
epoxy and push it through the material , this will give you the weight the fly
needs for the dying fish movement in the water and a firm base for the eyes to
stick to
19 – Place some more
epoxy to the side where the eye is going to go and place the eye on and leave
to set
and there you have it
a bloody great looking baitfish , of course you can choose what ever colors
you like these just float my boat for the predators , and action these flies
have in the water is stunning due to the fluid movement of the nayat , it
Really is an amazingly easy fly to tie have a go
Mcfluffchucker
(A cave in Scotland)
TIE A GLISS AND GLINT PLUS BULLHEAD
(The ultimate pike
glidebait fly)

STEP BY STEP

You will need
Hook- 6/0 wide gaped
hook
Thread – phantom
thread or clear mono
Body – gliss and
glint plus perch (or colour your choice)
Varnish – a touch
clear varnish
Glue – croc glue (the
toughest glue on the plane)
Eyes – 8mm hard eyez
Supplier links at the bottom of the page

1- Firstly place a
little glue onto the hook shank then lay down 2 wraps of mono along the shank
finishing in line with the hook point

2- Add a second very
thin layer of glue at the rear end of the hook shank, where the thread finishes
(this is to protect against teeth and give you a longer lasting fly)

3 – Take a pencil thickness length of gliss and
glint (a whole length) plus and fold in half, then whip on to the hook , before
you ad the next lot add a touch of varnish on the whipping (again to help guard
against teeth)

4 –you next take
another section of gliss and glint plus tied in slightly in front of the last
piece fold on
Half underneath
the hook and one half on top as above and that sorts out the tail end now for
the body

5 – Building the body is pretty much a repetitive
thing as you do the following steps over and over until you get to the
hookeye , so first take a whole section
of gliss and glint plus and cut it in half

6 – Take one of the
sections off gliss and glint plus and tease out the fibers so they are uneven
as above

7 - Take one piece of
gliss and place just in front of where you have tied in the tail make sure 90%
of the material is towards the tail, the 10% that’s facing forward will form
the head. You now need to place the same amount of material underneath and on
the sides so you use 2 full sections of gliss cut in half to give you 4
sections

8 – Once you have
placed all 4 pieces on as in step 7 add a touch of varnish and make sure it goes
all around the whipping

9 – Pull all the
sections back as above

10 – Then whip down
as above and varnish the whipping

11 – Follow all the
steps from step 5 to build up the body, don’t be concerned if you think the
body is to bulky we will trim it down at the end of the tie

12 – the final tie ,
you can see the fish shape formed nicely , although you may think this is quite
bulky there’s actually not a massive amount of material involved

13 – Once the final
piece has been tied in whip of and varnish to seal

14 – The raw finished
bullhead

15 – Allow the
varnish to dry and take the fly out of the vice ready for trimming

16 – time to trim ,
now with trimming the best thing is to trim small amounts at one time (you cant
stick it back on if you cut to much off) always trim from the back towards the front , I
usually start the sides first and work round , you need to start your trim from
the hook bend back

17 - Once you have
started trimming you’ll start to see the shape form very quickly

18 – if you want a
larger profile only trim the sides and bottom , this works well for bream and
perch patterns and the action will still be the same

19 – The fly fully trimmed
and waiting for eyes

20 – take 2 8mm
hardeyez and trim the stems, you need to make sure you don’t trim them flush as
you need a little bit of stem to secure them properly , if you trim them flush
they will at some point just fall off and you’ll lose the action of the fly

21 – hardeyez with
stems cut down just enough left to hold them securely in place

22 – Next you need to mix up a five min epoxy

23 - Take you dubbing
needle (I use a wine cork with a darning needle stuck into it) and force the epoxy
into the head this adds to the weight of the head and the action of the fly,
remember to push the needle right through

24 – add the eyes and
hold them in position for 2 mins and that’s you bullhead ready to fish
You can do this fly
in any size you like or any color just reduce the size of your eyes to match
the head
Supplier’s links
Hook- 6/0 wide gaped hook
Thread – phantom thread or clear mono
Body – gliss and glint plus perch (or colour your choice)
Varnish – a touch clear varnish
Glue – croc glue (the toughest glue on the plane)
Eyes – 8mm hard eyez
check back for more step by step by steps as i do them for all my predator step by steps please visit my website


No comments:
Post a Comment